Scripting (continued)
Processing
Several actions in Godot are triggered by callbacks or virtual functions, so there is no need to write code that runs all the time.
However, it is still common to need a script to be processed on every frame. There are two types of processing: idle processing and physics processing.
Idle processing is activated when the method Node._process() is found in a script. It can be turned off and on with the Node.set_process() function.
This method will be called every time a frame is drawn, so it’s fully dependent on how many frames per second (FPS) the application is running at:
func _process(delta):
    # Do something...
    pass
public override void _Process(float delta)
{
    // Do something...
}
The delta parameter contains the time elapsed in seconds, as a
floating point, since the previous call to _process().
This parameter can be used to make sure things always take the same amount of time, regardless of the game’s FPS.
For example, movement is often multiplied with a time delta to make movement speed both constant and independent from the frame rate.
Physics processing with _physics_process() is similar, but it should be used for processes that
must happen before each physics step, such as controlling a character.
It always runs before a physics step and it is called at fixed time intervals:
60 times per second by default. You can change the interval from the Project Settings, under
Physics -> Common -> Physics Fps.
The function _process(), however, is not synced with physics. Its frame rate is not constant and is dependent
on hardware and game optimization. Its execution is done after the physics step on single-threaded games.
A simple way to test this is to create a scene with a single Label node, with the following script:
extends Label

var accum = 0

func _process(delta):
    accum += delta
    text = str(accum) # 'text' is a built-in label property.
public class CustomLabel : Label
{
    private float _accum;

    public override void _Process(float delta)
    {
        _accum += delta;
        Text = _accum.ToString(); // 'Text' is a built-in label property.
    }
}
Which will show a counter increasing each frame.
Groups
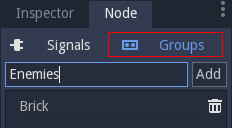
Nodes can be added to groups, as many as desired per node, and is a useful feature for organizing large scenes. There are two ways to do this. The first is from the UI, from the Groups button under the Node panel:
And the second way is from code. One example would be to tag scenes which are enemies:
func _ready():
    add_to_group("enemies")
public override void _Ready()
{
    base._Ready();

    AddToGroup("enemies");
}
This way, if the player is discovered sneaking into a secret base, all enemies can be notified about its alarm sounding by using SceneTree.call_group():
func _on_discovered(): # This is a purely illustrative function.
    get_tree().call_group("enemies", "player_was_discovered")
public void _OnDiscovered() // This is a purely illustrative function.
{
    GetTree().CallGroup("enemies", "player_was_discovered");
}
The above code calls the function player_was_discovered on every
member of the group enemies.
It is also possible to get the full list of enemies nodes by
calling
SceneTree.get_nodes_in_group():
var enemies = get_tree().get_nodes_in_group("enemies")
var enemies = GetTree().GetNodesInGroup("enemies");
The SceneTree class provides many useful methods, like interacting with scenes, their node hierarchy and groups of nodes. It allows you to easily switch scenes or reload them, to quit the game or pause and unpause it. It even comes with interesting signals. So check it out if you got some time!
Notifications
Godot has a system of notifications. These are usually not needed for scripting, as it’s too low-level and virtual functions are provided for most of them. It’s just good to know they exist. For example, you may add an Object._notification() function in your script:
func _notification(what):
    match what:
        NOTIFICATION_READY:
            print("This is the same as overriding _ready()...")
        NOTIFICATION_PROCESS:
            print("This is the same as overriding _process()...")
public override void _Notification(int what)
{
    base._Notification(what);

    switch (what)
    {
        case NotificationReady:
            GD.Print("This is the same as overriding _Ready()...");
            break;
        case NotificationProcess:
            var delta = GetProcessDeltaTime();
            GD.Print("This is the same as overriding _Process()...");
            break;
    }
}
The documentation of each class in the Class Reference shows the notifications it can receive. However, in most cases GDScript provides simpler overrideable functions.
Overrideable functions
Such overrideable functions, which are described as follows, can be applied to nodes:
func _enter_tree():
    # When the node enters the _Scene Tree_, it becomes active
    # and  this function is called. Children nodes have not entered
    # the active scene yet. In general, it's better to use _ready()
    # for most cases.
    pass

func _ready():
    # This function is called after _enter_tree, but it ensures
    # that all children nodes have also entered the _Scene Tree_,
    # and became active.
    pass

func _exit_tree():
    # When the node exits the _Scene Tree_, this function is called.
    # Children nodes have all exited the _Scene Tree_ at this point
    # and all became inactive.
    pass

func _process(delta):
    # This function is called every frame.
    pass

func _physics_process(delta):
    # This is called every physics frame.
    pass
public override void _EnterTree()
{
    // When the node enters the _Scene Tree_, it becomes active
    // and  this function is called. Children nodes have not entered
    // the active scene yet. In general, it's better to use _ready()
    // for most cases.
    base._EnterTree();
}

public override void _Ready()
{
    // This function is called after _enter_tree, but it ensures
    // that all children nodes have also entered the _Scene Tree_,
    // and became active.
    base._Ready();
}

public override void _ExitTree()
{
    // When the node exits the _Scene Tree_, this function is called.
    // Children nodes have all exited the _Scene Tree_ at this point
    // and all became inactive.
    base._ExitTree();
}

public override void _Process(float delta)
{
    // This function is called every frame.
    base._Process(delta);
}

public override void _PhysicsProcess(float delta)
{
    // This is called every physics frame.
    base._PhysicsProcess(delta);
}
As mentioned before, it’s better to use these functions instead of the notification system.
Creating nodes
To create a node from code, call the .new() method, like for any
other class-based datatype. For example:
var s
func _ready():
    s = Sprite.new() # Create a new sprite!
    add_child(s) # Add it as a child of this node.
private Sprite _sprite;

public override void _Ready()
{
    base._Ready();

    _sprite = new Sprite(); // Create a new sprite!
    AddChild(_sprite); // Add it as a child of this node.
}
To delete a node, be it inside or outside the scene, free() must be
used:
func _someaction():
    s.free() # Immediately removes the node from the scene and frees it.
public void _SomeAction()
{
    _sprite.Free(); // Immediately removes the node from the scene and frees it.
}
When a node is freed, it also frees all its children nodes. Because of this, manually deleting nodes is much simpler than it appears. Free the base node and everything else in the subtree goes away with it.
A situation might occur where we want to delete a node that is currently “blocked”, because it is emitting a signal or calling a function. This will crash the game. Running Godot with the debugger will often catch this case and warn you about it.
The safest way to delete a node is by using Node.queue_free(). This erases the node safely during idle.
func _someaction():
    s.queue_free() # Queues the Node for deletion at the end of the current Frame.
public void _SomeAction()
{
    _sprite.QueueFree(); // Queues the Node for deletion at the end of the current Frame.
}
Instancing scenes
Instancing a scene from code is done in two steps. The first one is to load the scene from your hard drive:
var scene = load("res://myscene.tscn") # Will load when the script is instanced.
var scene = (PackedScene)ResourceLoader.Load("res://myscene.tscn"); // Will load when the script is instanced.
Preloading it can be more convenient, as it happens at parse time (GDScript only):
var scene = preload("res://myscene.tscn") # Will load when parsing the script.
But scene is not yet a node. It’s packed in a
special resource called PackedScene.
To create the actual node, the function
PackedScene.instance()
must be called. This will return the tree of nodes that can be added to
the active scene:
var node = scene.instance()
add_child(node)
var node = scene.Instance();
AddChild(node);
The advantage of this two-step process is that a packed scene may be kept loaded and ready to use so that you can create as many instances as desired. This is especially useful to quickly instance several enemies, bullets, and other entities in the active scene.